From planning to powering up — if you want to entertain year-round and be the host with the most, check out our tips for designing the perfect outdoor kitchen.
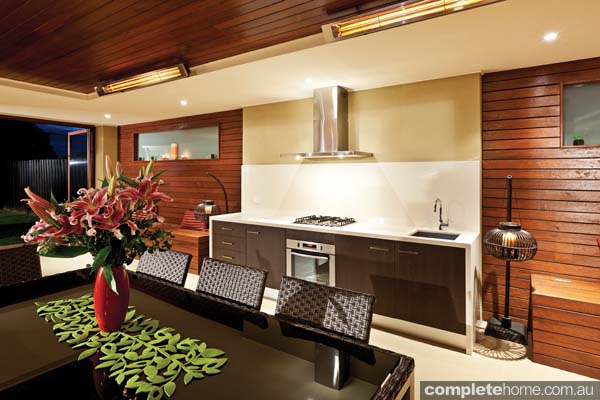
An outdoor kitchen complete with sink, storage, and ample bench space. Photo courtesy of Alfresco Living.
Considering how much Australians love the outdoors — and barbecuing — it won’t come as a great surprise that the outdoor kitchen is one of the fastest growing lifestyle trends. The beauty of having one is that it centralises every aspect of entertaining: the cooking, eating, and fun is all had in the one space outside.
Gone are the days of hosts having to traipse in and out of the house carrying food, plates, cutlery and so on. With an outdoor kitchen, everything is in the one space. And best of all, cooking smells stay outside!
1. Planning and design
To get started, the budget is your most important tool. Determine exactly how much you have to spend and don’t forget to allow for labour costs if you get a professional company to install it, as well as the cost of all the appliances (dishwasher etc) and hardware (such as wood, plumbing supplies, sink, lighting, and draw handles). It’s always worthwhile leaving a little extra as a buffer as there are bound to be a few hidden costs here and there or things you’ll need that you weren’t aware of.
Once you’ve determined your budget, stick to it — it’s easy to get carried away. To avoid having a half-fabulous, half-finished kitchen, stick to your plan.
2. Do your research
Make a wish list of everything you’d ideally like, then work out what you can afford and what can fit in the allocated space. Think about how you entertain and the type of food you like to eat. Would you get use out of a rotisserie, a pizza oven, a wok burner, or a teppanyaki plate? Do you like to cook seafood on a barbecue plate or is grilling steaks on a flame more your thing? Would you like to be able to roast meats as well?
Also think about whether you’d like gas burners so you can cook side dishes such as vegetables. If you want it to be a truly comprehensive space, you may also want to consider having an oven and a microwave in the area.
Your options
- Barbecue
- Microwave
- Extractor fan
- Oven
- Rotisserie
- Pizza oven
- Wok burner
- Teppanyaki plate
- Sink
- Freezer
- Ice maker
- Beer trough
- Wine fridge
- Dishwasher
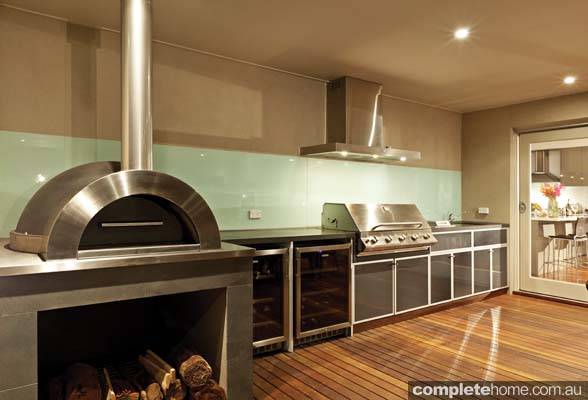
A wood-fired oven is a key element of this outdoor kitchen. Photo courtesy of Justine Carlile Landscape Design.
3. Room to move
Once you know what you’ve got to work with in terms of finances, measure the available space in your backyard. If space is minimal, you won’t be able to have the whole kit and caboodle, but that doesn’t mean you can’t have a fabulous outdoor kitchen. Essentially, the more space you have, the fancier it can get, but you don’t need a lot of room to do it well.
It’s important to think very carefully about how much room you want the outdoor kitchen to take up; if space is limited in your yard you’ll need to exercise restraint or there’ll be no room to sit and relax or do anything else. You’ll need to find the right balance between a kitchen that will meet your needs and retaining enough space for entertaining. When you’re doing your measurements and planning, don’t forget to allow enough room for outdoor furniture such as lounges and a dining table so you have somewhere to sit and eat.
4. Head for cover
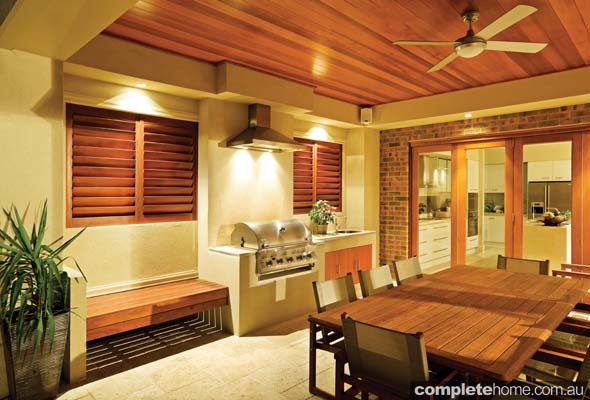
Remember that your outdoor kitchen needs to be completely covered and weatherproof. This can mean positioning it under an existing permanent roof (such as a verandah), having a roofing extension built, or even erecting a pergola-type structure. If building a pergola, it will need a solid roof. Another option is a retractable sail or awning that can be pulled back during fine weather and extended when it’s rainy or when the outdoor kitchen isn’t being used.
Side protection is also important, so if your outdoor room doesn’t have solid walls to protect the kitchen, you can always plants a dense hedge or erect a screen to keep wind and rain from entering at the sides.
With a few simple additions such as heating (think strip heaters in the ceiling, a built-in fireplace, or just a patio heater) and fans (ceiling fans or free-standing), the area can truly be used throughout the year, regardless of the weather.
This Justine Carlile-designed kitchen and dining area is perfectly placed for an easy indoor-outdoor flow.
5. Space out
Where will your guests be seated and where will they eat? Bench space is an important design consideration, particularly if you plan for your guests to sit around the bench to eat.
The layout of your outdoor kitchen should provide for room to eat, whether it’s a space for a dining table or simply bar stools set around the outside of the benches.
If space is limited, a galley-style kitchen is ideal or an L-shaped bench design. Larger areas are great for U-shaped layouts and can incorporate an island bench with cupboard space underneath.
When choosing the site for your outdoor kitchen, the distance from the inside kitchen is something that needs to be considered and will determine whether you need to incorporate extra storage, refrigeration, or washing-up facilities.
6. Power up
You will need a qualified plumber and electrician for all connections to your outdoor kitchen. When it comes to gas you’ll also need to identify which gas supply you will be using so that you can purchase appliances accordingly.
By Sunny de Bruyn
Originally from Outdoor Design & Living magazine Volume 26


