
When you grow your own grapes and make your own wine, like this gardener, any time is party time
Aldo Mannarino met his wife Connie in 1967. They got married a couple of years later and came to Australia, settling in Coburg in Melbourne. Now a retired tiler, Aldo’s hobbies include growing fruit and vegetables, making salami and tomato sauce and grafting all types of fruit trees. Gardening is something his wife Connie isn’t allowed to do. In fact, she isn’t allowed in the garden full stop but she sure can whip up a classic dish or two when the kids come over.
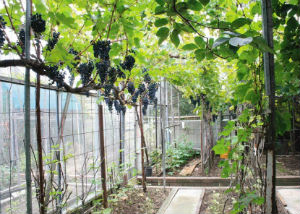
You’d need a map to take a tour around Aldo’s garden. It’s an intricate maze of warren-like pathways with segregated garden beds, all caged with chicken-wire mesh wrapped around a metal framework. Aldo has even installed a door to each of these sections but don’t ask me why, because the whole garden is enclosed, so surely it needs only one door. Every section is planted with different vegetables, the whole lot draped with grapevines. Graceful bunches of the fruit hang everywhere. It’s a sight to behold. Of all the traditional skills Aldo has developed over the years, his specialty is pretty obvious: winemaking, using techniques he learnt from his father back in the days when grape crushing was done with feet only — and lots of them.
Today, though the equipment is a little more sophisticated, the winemaking tradition lives on through Aldo’s children who come over to help Dad make 250 bottles of wine … yep, 250 bottles a year, folks, and that’s every year. He makes a Cab Sav and Shiraz blend with a dash of Pinot — all chemical-free.
Aldo’s Winemaking Tips
Step 1.
Pick your grapes and press them immediately after picking them. When picking them, remember — the smaller the better,
Step 2.
Feed the grapes through a grape crusher but if you don’t have one start washing your feet and get ready for some slippery fun times. You don’t need to squash every single grape until it is unrecognisable, just until the pulp is squashed out.
Step 3.
Place all the juice and crushed grapes into a wooden or plastic vat and cover completely with shade cloth or similar to prevent insects from breeding. Using a large plunger, push grapes down every day to ensure they are covered completely with juice. The grapes are required to remain in the vat for at least 8 to 10 days to allow fermentation to take place. Fermentation, in simple terms, is when the sugar content in the grape juice turns into alcohol with the help of yeast, which is present on grape skin. This fermentation process can vary in length of time, depending on the quantity of yeast and the temperature of the juice. Patience is required!
Step 4.
After 10 days, drain all the juice from the vat into a separate vat, take all the remaining grapes and skins and place them into a wine press to squeeze the remaining juices completely out of them. If you don’t own a wine press, you can use a couple of G-clamps and two 40cm square pieces of 16mm plywood or similar.
Step 5.
Pour all the juice from the press and the vat together into a wine barrel, making sure to fill the wine barrel completely, leaving no air pockets as this will only inhibit bacterial growth, which will destroy any chance of making the best wine in the world. Seal the wine barrel tightly and store it in a cool, dark place for a minimum 40 days after which the wine should be ready for bottling. It is always a good idea to keep a couple of litres of juice in a separate sealed bottle so you can top up the wine barrel every few days, as the level drops due to absorption into the wood.
Step 6.
Pour wine into sterilised bottles and seal using a bottle top machine or a screw top. Allow the bottles to lie on their sides for at least 1–2 weeks before the drinking begins.
Step 7.
As Aldo would say, salute. Let the drinking begin!


